


1 of 13
Overview
Turn wasted space into ultra-organized space with a couple afternoon’s worth of time and less than $200. Hang plastic storage bins above your garage door on wooden rails. The bins protect your valuables from the pests, dust and moisture typically found in garage environments. Hanging the bins on rails makes them easy to access as well as using space that normally sits empty. You need just 15 inches above your open garage door to take on this project. The method shown here works for both tight clearance and extremely high ceilings.
Jeff Farris 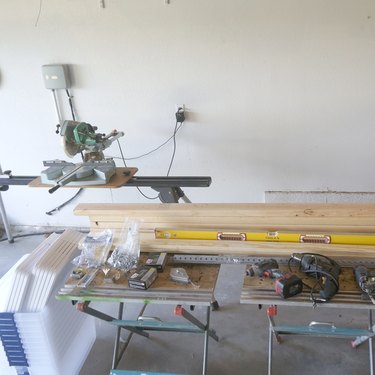 2 of 13
Things You Will Need
You will need 3 two-by-fours, 2 one-by-threes and 1 one-by-four, all 8 feet long, to make the rails. Depending on your ceiling height, you’ll need another two-by-four and 5 or 6 sections of perforated angle that are 4 feet long (to hang the rails). You’ll need a saw to cut the lumber, a hack saw or jig saw to cut the steel, a drill with 3/8 inch bit, a driver drill and various screws and bolts (determined by your application). Choose bins that are just under 2 feet wide, about 1 foot deep and have sturdy reinforcement in the lip area where they will be hanging. You will need 8 bins.
Jeff Farris 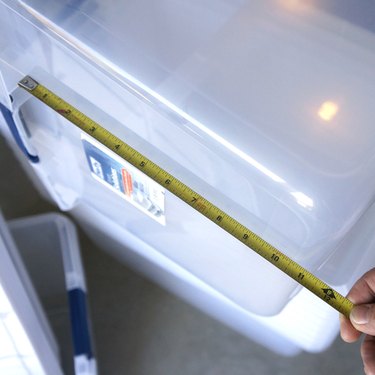 3 of 13
Calculating Rail Position and Spacing
Measure the depth of your bins, from the point where they will be resting to the bottom. Measure the length of the bins where they will fit between the rails. The bins used here measure 11 1/2 inches in depth and 21 3/4 inches long, both measurements just under the handles. Multiply the length by two and add 5 1/2 inches — 49 inches using these bins. Cut a two-by-four to this dimension.
Jeff Farris 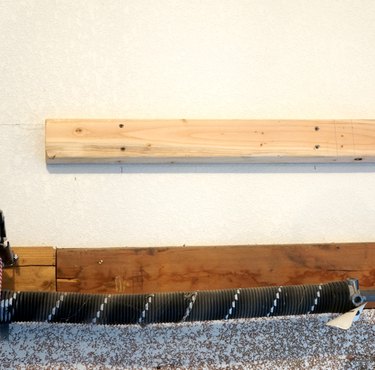 4 of 13
Attach Ledger Board
Subtract 3/4 inch from the depth of your bins. Put a mark on the wall above the garage door this distance from the highest part of your garage door hardware (most likely the return spring or the track of an automatic opener). Using a level, extend a line across the wall at that height. Locate the studs in the wall between the edge of the garage door and the centerline of the door. Hold the two-by-four cut in the previous step just below the marked line and centered between the garage door rail and the centerline of the door. Attach the two-by-four to the studs with construction screws.
Jeff Farris 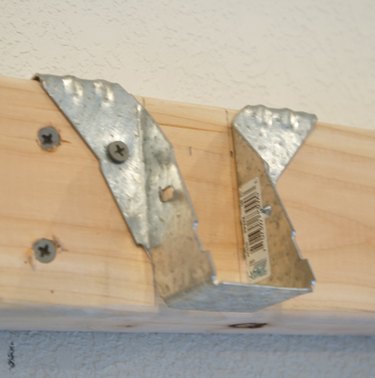 5 of 13
Center Hanger
Add a two-by-four joist hanger to the exact center of your ledger board.
Jeff Farris 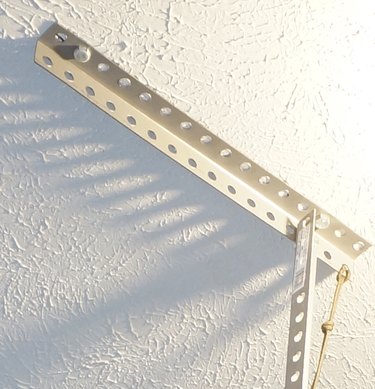 6 of 13
Perforated Angle Attachment
Cut three pieces of perforated angle 16 inches long. Locate the ceiling joist closest to 8 feet from the door. Attach a piece of perforated angle directly above where the end of each rail will be. Position them so that the rail hanging down will be within a hole or two of the end of the 16 inch section as shown in the photo. Secure the perforated angle to the ceiling joists with 3 1/2″ lag screws.
Jeff Farris 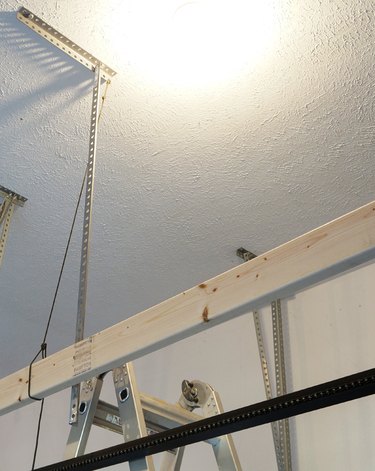 7 of 13
Hang Rails
Support one end of one of the two-by-four rails with a piece of cord tied to the perforated angle. Adjust the cord so that the two-by-four is close to level when the other end is flush with the ledger board. Screw the two-by-four to the end of the ledger board using one screw. Repeat with the other two rails, securing the center rail in the joist hanger.
Jeff Farris 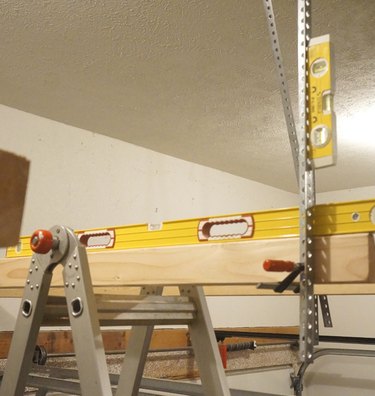 8 of 13
Level Rails
Hang a piece of perforated angle from the piece attached to the ceiling using a 3/8 inch hex head bolt and nut. Select the hole that allows the piece to hang straight down when the two-by-four rail is square to the wall. Clamp the two-by-four rail to the perforated angle, adjusting it up and down until the rail is level and the perforated angle is plumb. Drill a hole through the two-by-four through one of the holes in the perforated angle. Bolt the angle to the two-by-four with a 2 inch long 3/8 inch bolt and hex nut. Repeat for all three rails. When the rails are level and square to the wall, add another screw to each where it joins the ledger board.
Jeff Farris 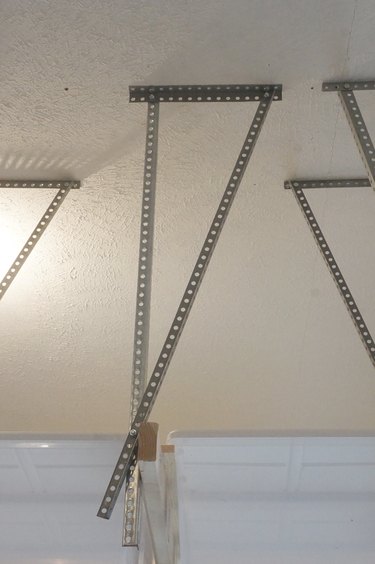 9 of 13
Brace Hangers
Brace the perforated angle hanger with a second piece intersecting just above the rail as shown in the photo. Adjust the brace up or down until one of the holes align and secure with a 3/8 inch hex head bolt and nut. Note: The ceiling in the photographed garage is unusually high. Your hangers and braces will likely be much shorter.
Jeff Farris 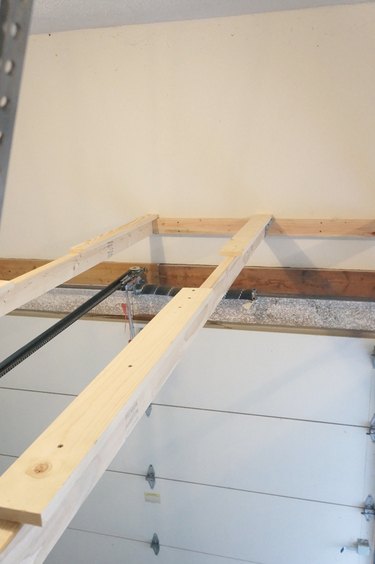 10 of 13
Top Rails
Cut 4 one-by-threes and 2 one-by-fours to a length of 36 inches. Attach one-by-threes to the outside rails with construction screws and wood glue. Check the overhang as you screw it on, keeping one inch hanging on the inside. Attach the one-by-fours to the center rail, keeping them centered with one inch overhanging both sides. Start one set flush to the wall. Leave a gap equal to the width of your bins plus two inches between the first set and the second set. This gives you a place to put the bins on the rails from the middle, so you don’t have to remove them all to get to the one closest to the wall.
Jeff Farris 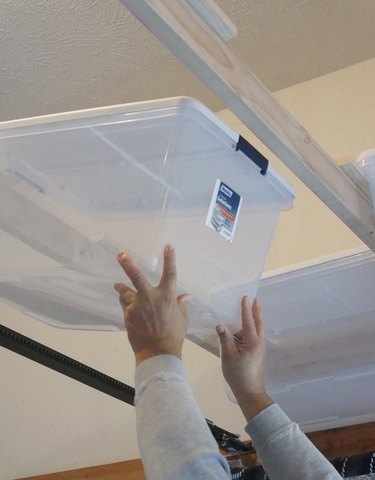 11 of 13
Install Bins
Slide all your bins in place and check for areas where the rails are too tight. If the rails bind the bins, sand or plane the edges until the bins slide easily.
Jeff Farris 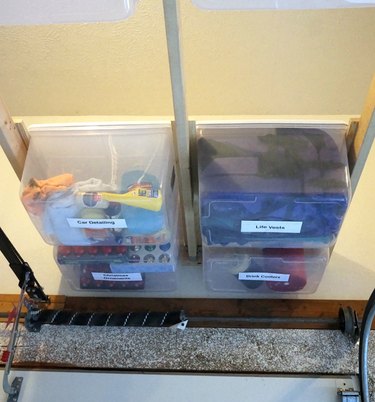 12 of 13
Final Inspection
Make sure that your installed bins don’t interfere with your garage door or door opener. Now you’re ready to load them up with bulky seasonal items that need a home, but not daily access. Limit what you store in these bins to bulky but light weight items. The bins are plastic, and plastic can crack. If the worst happens, you don’t want heavy items landing on your car (or your head).
Jeff Farris  13 of 13
Tool Tip Basics: Jigsaw
Learn how to use a jigsaw safely.
Related: Tool Tip Basics: Jigsaw
Demand Media


